Monday, February 11, 2013

My Children's Valentines

Hello!  Today I thought I would share the Valentines that my kids will be handing out in their classes this week.  I know they aren't award winning but they were very easy and something that my kids could help me with.  We have about 100 to make so it had to be easy to assemble, that was a requirement for my oldest son, Dennis.  I used the Doodle Charms and Tags & More cartridges to make these. 
I made these with to different shades of pink paper and the paper is double sided.  My kids will have a lot of options when putting these together.  I made these so that they have some samples to look at when assembling.  The stamps are by Jaded Blossom.
 
I stamped to and from on the back side of the Valentines. 
 
We are putting pencils in the treat holds that we are making.  This is the time of year that the teachers begin asking for pencils again at school.  I know some of the kids that receive them would rather get candy but this will be useful to them in class.  I had to resort to yellow pencils because I could not find any cute Valentine or any other color of pencil to use. 
 
Well I hope you enjoyed the treat holders and thanks for stopping by.
 
Margaret


Saturday, February 9, 2013

Jaded Blossom February Challenge

Hello!  Today I am posting my entry into the Jaded Blossom February Challenge.  I created two purse treat holders with non-traditional Valentine's colors for my daughters.  I used Wedding Candies, I selected stamps that were relative to Valentine's, to decorate candies that I filled the purses with.  I used the Forever Young Cricut cartridge to cut out two different purse styles. 
The brown purse was embossed and then chalked before it was assembled.  I created flowers that coordinated with the patterns that were inset in the hearts of each purse. I also used the patterned papers to create brads that were used as centers for the larger flowers.  The flowers were cut from the Tattered Flowers Alterations dies by Tim Holtz.   The brown purse is for my oldest daughter, Ruby, and the blue purse is for Katherine. 
I am also submitting this into the Decorate to Celebrate Challenge @ http://decoratetocelebrate.blogspot.com/ .  Please by and check out all the neat projects the ladies at Decorate to Celebrate have going on.  I hope you liked the treat holders and thanks for stopping by. 
 
Margaret

Thursday, February 7, 2013

Heartbreaker Layout

Hello!  Today I am posting a layout that I created for my daughter, Ruby.  Just a little background about her, she is in the 6th grade and 12 years old.  Her dad and I hear her talk about her "boyfriends" all the time.  Girls at this age this age really have no idea.  Maybe she will look back at this time in her life and smile, when she sees this many years from now.  I started with two printed papers from the Notebook Doodles Imagine cartridge and then went wild.
The title and the heart/shadow were cut from the Indie Art Cricut cartride, the pocket was cut from the Old West cartridge and I cut the graphic boy and recycle arrows from one of the sheets I printed from the Notebook Doodles Imagine cartridge.  I used a portion of a piece of Notebook printed paper from that same cartridge that I punched with a composition edge to make the journaling area in the bottom left corner. 
 
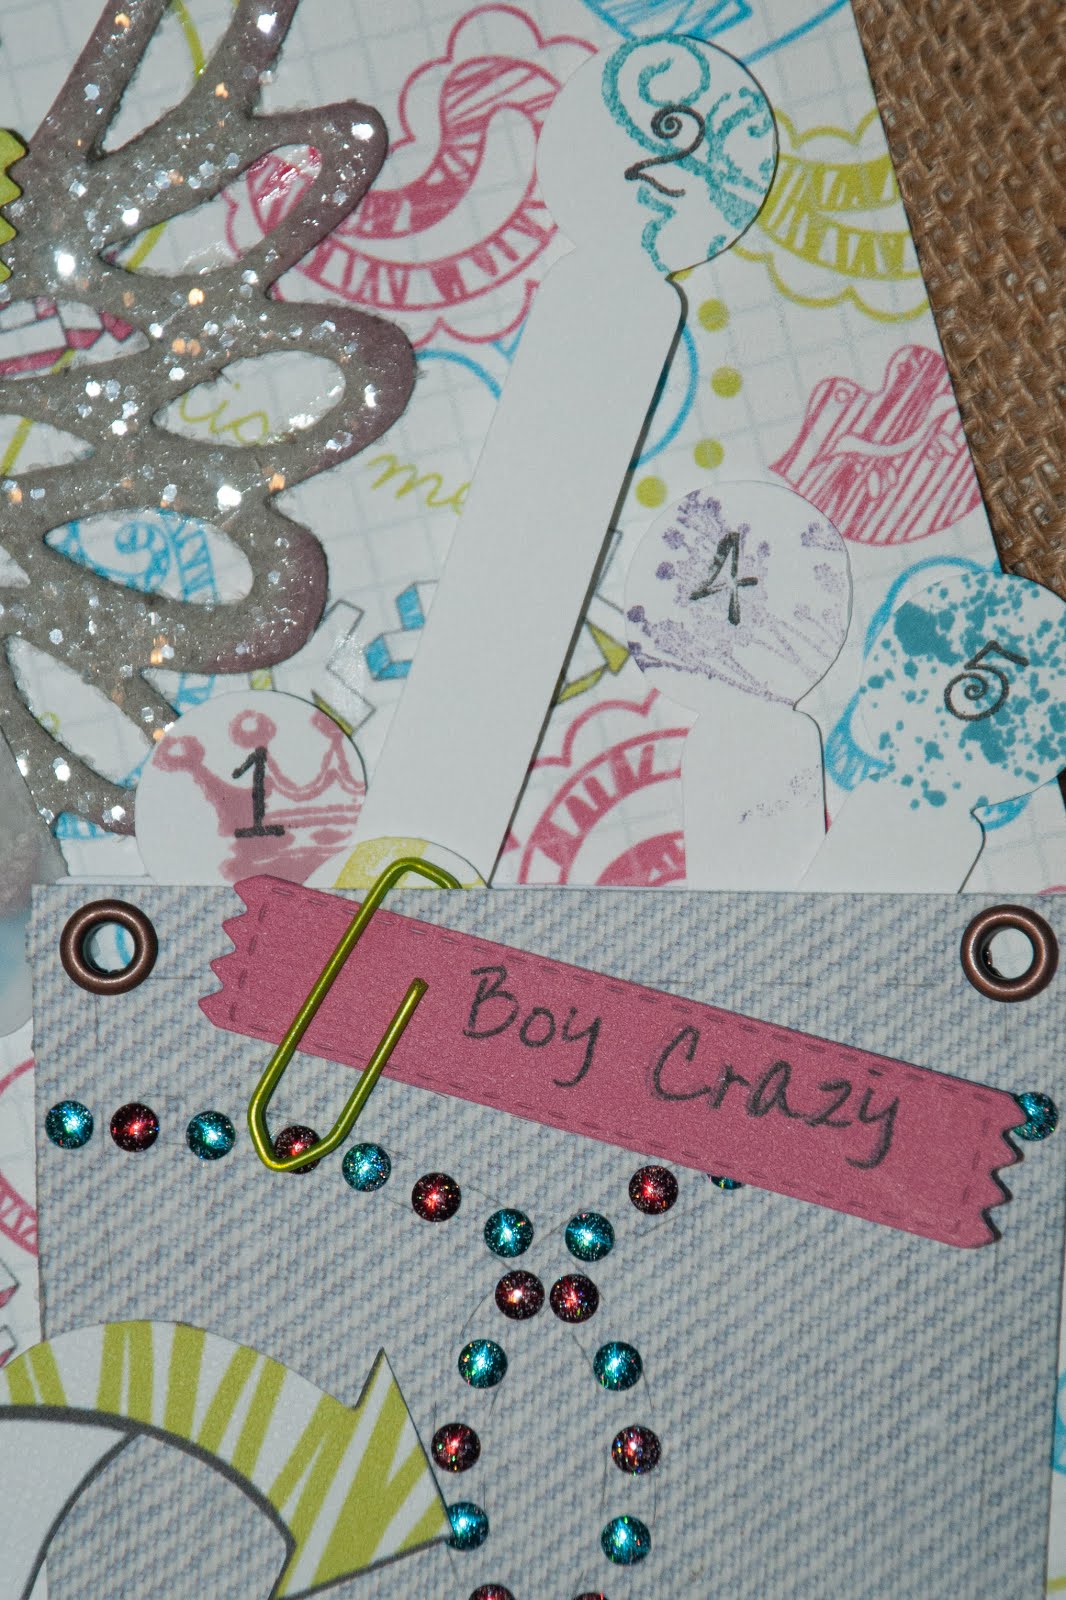
Above you can see some of the details of the heart.  I embossed the black heart with D'Vine Swirls and then chalked the embossing with coordinating colors.  This really looked good, if I must say so myself.  The wings are chipboard thats edges were inked in pink and then I just put some chucky glitter all over them.  I cut to picture mattings from a My Creative Die, one from cardstock but the other from vellum.  I ran the vellum matting through a few different embossing folders.  Below you can see the more of the detail of the pocket and the graphic boy.  I placed a red chipboard heart on the boy.  Then, I used some coordinating studs to embellish the pocket and I added eyelets to look like rivets on jeans. 
 
Inside the pocket I made some tags that she can write what she has learned or she can list all the boys that she has left with broken hearts.  I thought she would like that.  Thanks for stopping by and I hope you enjoyed the layout.
 
I am submitting this into:
The Fantabulous Cricut Challenge--Queen of Hearts
The Cuttlebug Spot Challenge--Love is in the Air
Connie Can Crop February Challenge
 
Margaret

Tuesday, February 5, 2013

Trendy Twine February Challenge- Sweets for My Sweetie

Hi!  Today I am submitting my entry into the February Trendy Twine Challenge.  I made two sucker treat holders for this challenge.  I have a die that cuts a sucker treat holder by MCT but the top of the treat holder is a scallopped circle but I wanted a heart on top instead.  I created the sucker treat holder using my Gypsy and Cricut.  I used Cherry Blow Pop, continuing with the red or pink theme.
I am not sure if you can see the embossing on the the base(pink portion of the holder), but I did emboss the treat holder to add some dimension to the holders.  I cut red scalloped hearts that were tied to the holders with white embroidery floss.  On the holder below, I cut a large heart (on white paper) and embossed it with the D'vine Swirls folder and then chalked the embossing with red chalk.  The stamps on this holder are from Jaded Blossom, Valentine Treats.
 
For the holder below, I embossed another red scalloped heart and chalked that embossing with white chalk to add some interest.  The stamps, Classmate Valentine, for this holder and the center circle die cut are from My Creative Time.  I am going to send this to my cousin, that is a teacher.  My kids may make these for their teachers this year.
 
Well, I hope you enjoy this.  I had a lot of fun making these.  Thanks for stopping by.
Margaret

Saturday, February 2, 2013

Fantabulous Cricut Challenge Blog #146- Time Flies

Hello, once again.  Today, I am posting my entry for the FCCB challenge.  I got behind on my youngest son's First Year scrapbook.  Most of the book was completed before he arrived, but I had not completed pages for January or October.  All the other months were completed and almost all the major milestones were completed in advance, but those two had me stumped.  I took this opportunity to complete the January page.  This is what I came up with.
I used the Designer Calendar cartridge for the January title, the Celebration cartridge for the hat, Elegant edges & Plantin Schoolbook for the photo matting that I created, and the Plantin Schoolbook & Tags 1 cartridge for the Top Five Tags.  I used the MCT gift card die to create the pocket for the Top 5 tags.  I embossed part of the card before I cut the die and I inked the embossing with some blue ink.  
Those tags are to write down a few of the special things.  January was a monumental month.  He took his first steps and we are starting to see more of his personality.  The flag paperclipped to the pocket is a die cut from MCT and so are most of the stamped sentiments.  I haven't put the picture in the blue matting but I will as soon as I get my photos printed.  I used a bookmark index card that I bought at WalMart (if I remember correctly).  There are 5 different colors of cards and these may come in handy for journaling.   
Looking at the index card now, I will probably distress the edges.  I didn't cut out a clock image with my Cricut.  I decided to stamp and emboss some clock faces.  The stamps were Tim Holtz.  I just cut them out and used glue dots to place them.  I added a flag at the last minute with Good Times stamped on it.  I had so much fun with this layout.  Thanks for stopping by and I hope you enjoy the layout.
 
 
Margaret

Friday, February 1, 2013

The Cuttlebug Spot Challenge-A Star is Born

Hello everyone!  I am posting my entry into this week's Cuttlebug Spot Challenge.  I have two sports stars in my family, Dennis and Ruby, they played basketball this year in Mini-Hoops.  This gave me an excellent opportunity to make a layout for their basketball season this year.  I haven't printed my pictures yet to place in the mattings, so you will have to imagine that there are cute pics in these layouts.  I made two scrapbook pages with the same layout for both.
Their mascot is a lion (from Team Spirit cartridge), school colors are red, white & blue, and both of them were #23 (jersey from basketball cartridge).  I used MCT dies for the smaller matting and the strip that has sentiment stamped (MCT stamps) on it.  The larger matting was created with my gypsy.  One of the mattings was ran through a star embossing folder before cutting with the die.  I then used red and blue chalks to enhance the star embossing.  I used the same technique except with a different embossing folder and ink instead for part of my title.  You can get a closer look at these two items below.
I cut out stars from the Plantin School cartridge and used Sports candies stamps by Jaded Blossom to add more detail.  I used a set of Doodlebug font stamps for the letters to makeup their names on each layout.  I also used a ticket stamp in a set by Karen Foster to make my journaling area.  This turned out super cute!
 I included below a picture of my daughter, Ruby's page. 
I hope you liked this layout and thanks for stopping by.
 
Margaret

Wednesday, January 30, 2013

My Creative Time Challenge- 1 bow, 2 patterned papers & 3 buttons

Hello!  Today I am posting by entry into the My Creative Time Challenge--1,2 &3.  I had so much fun with this.  My youngest daughter's birthday was last Friday and I took cupcakes and punch up to her pre-school class for snacks.  She just had a blast and I got some pictures of her and her friends.  I used this challenge to create a scrapbook layout for this occasion.
   
I used a lot of MCT dies:  the Just Simply Live set, Hello Spring Set (to make balloons), the label and the cupcake set.  This made my layout soooo easy.  I have a few close up shots of some details.  I used a bow to tie up my balloons, 2 patterned papers and 3 buttons.  The pink photo matting was ran through a sizzix folder first to emboss and then the matting was cut, to be sure that the stitching details were not damaged when embossing.  I am not sure if you can see that detail below, but it's there.   
I created a larger photo matting that coordinates with the MCT dies with my Cricut and Gypsy.  I used rectangles from Plantin School and an edge from Elegant Edges to create the larger matting for a picture of my daughter.  Sorry, Emma but the small matting just could not contain her happiness that day!  I cut that matting and then embossed it with a Polka Dots embossing folder.  
I  used several different cricut cartridges to cut the title and the #5 candle.  I didn't make a note of which ones, but if anyone is interested let me know and I will get that information to you.  I am including one more picture of the balloons.  I wish that I had a different bakers twine to use for the strings but I have tried not to invest a lot in twine, plus I just don't have much luck when using it.  I seem to have technical difficulties with it.   
I also used some super cute ribbon that I found somewhere, not sure where now, but it worked so well with the theme.    Well I hope you enjoyed my layout and thanks for stopping by.

Margaret